ShopDreamUp AI ArtDreamUp
Deviation Actions


Suggested Deviants


Suggested Collections


![Dominator - Psycho-Pass [Breakdown]](https://images-wixmp-ed30a86b8c4ca887773594c2.wixmp.com/f/82a9ca10-661e-44bd-9b33-6b8b7c56ad76/d5nznj8-91109eaf-ecdf-4ae6-a52f-d97766b5ce48.jpg/v1/crop/w_184,h_184,x_44,y_0,scl_0.14352574102964,q_70,strp/dominator___psycho_pass__breakdown__by_amaterasu111_d5nznj8-92s-2x.jpg?token=eyJ0eXAiOiJKV1QiLCJhbGciOiJIUzI1NiJ9.eyJzdWIiOiJ1cm46YXBwOjdlMGQxODg5ODIyNjQzNzNhNWYwZDQxNWVhMGQyNmUwIiwiaXNzIjoidXJuOmFwcDo3ZTBkMTg4OTgyMjY0MzczYTVmMGQ0MTVlYTBkMjZlMCIsIm9iaiI6W1t7ImhlaWdodCI6Ijw9NjU3IiwicGF0aCI6IlwvZlwvODJhOWNhMTAtNjYxZS00NGJkLTliMzMtNmI4YjdjNTZhZDc2XC9kNW56bmo4LTkxMTA5ZWFmLWVjZGYtNGFlNi1hNTJmLWQ5Nzc2NmI1Y2U0OC5qcGciLCJ3aWR0aCI6Ijw9MTI4MCJ9XV0sImF1ZCI6WyJ1cm46c2VydmljZTppbWFnZS5vcGVyYXRpb25zIl19.-jIrYVNjKYOMImOE0_Gnl6Jx9bviloe2hS2BXN1jeFs)
![Dominator - Psycho-Pass [Breakdown]](https://images-wixmp-ed30a86b8c4ca887773594c2.wixmp.com/f/82a9ca10-661e-44bd-9b33-6b8b7c56ad76/d5nznj8-91109eaf-ecdf-4ae6-a52f-d97766b5ce48.jpg/v1/crop/w_92,h_92,x_22,y_0,scl_0.071762870514821,q_70,strp/dominator___psycho_pass__breakdown__by_amaterasu111_d5nznj8-92s.jpg?token=eyJ0eXAiOiJKV1QiLCJhbGciOiJIUzI1NiJ9.eyJzdWIiOiJ1cm46YXBwOjdlMGQxODg5ODIyNjQzNzNhNWYwZDQxNWVhMGQyNmUwIiwiaXNzIjoidXJuOmFwcDo3ZTBkMTg4OTgyMjY0MzczYTVmMGQ0MTVlYTBkMjZlMCIsIm9iaiI6W1t7ImhlaWdodCI6Ijw9NjU3IiwicGF0aCI6IlwvZlwvODJhOWNhMTAtNjYxZS00NGJkLTliMzMtNmI4YjdjNTZhZDc2XC9kNW56bmo4LTkxMTA5ZWFmLWVjZGYtNGFlNi1hNTJmLWQ5Nzc2NmI1Y2U0OC5qcGciLCJ3aWR0aCI6Ijw9MTI4MCJ9XV0sImF1ZCI6WyJ1cm46c2VydmljZTppbWFnZS5vcGVyYXRpb25zIl19.-jIrYVNjKYOMImOE0_Gnl6Jx9bviloe2hS2BXN1jeFs)


You Might Like…


Featured in Groups


Description
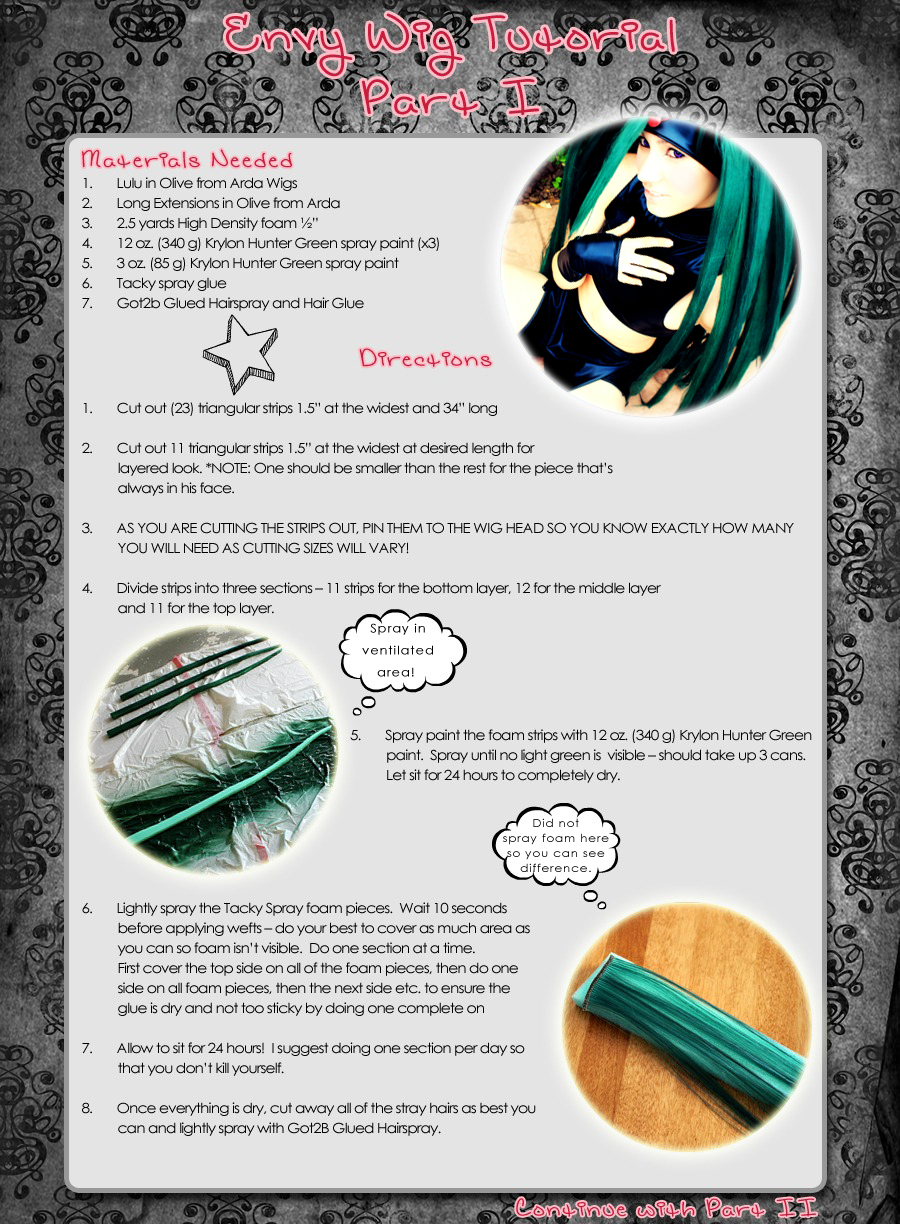
Materials Needed
1. Lulu in Olive from Arda Wigs
2. Long Extensions in Olive from Arda
3. 2.5 yards High Density foam ½”
4. 12 oz. (340 g) Krylon Hunter Green spray paint (x3)
5. 3 oz. (85 g) Krylon Hunter Green spray paint
6. Tacky spray glue
7. Got2b Glued Hairspray and Hair Glue
Directions
1. Cut out (23) triangular strips 1.5” at the widest and 34” long
2. Cut out 11 triangular strips 1.5” at the widest at desired length for layered look. *NOTE: One should be smaller than the rest for the piece that’s always in his face.
3. AS YOU ARE CUTTING THE STRIPS OUT, PIN THEM TO THE WIG HEAD SO YOU KNOW EXACTLY HOW MANY YOU WILL NEED AS CUTTING SIZES WILL VARY!
4. Divide strips into three sections – 11 strips for the bottom layer, 12 for the middle layer and 11 for the top layer.
5. Spray paint the foam strips with 12 oz. (340 g) Krylon Hunter Green paint. Spray until no light green is visible – should take up 3 cans. Let sit for 24 hours to completely dry.
6. Lightly spray the Tacky Spray foam pieces. Wait 10 seconds before applying wefts – do your best to cover as much area as you can so foam isn’t visible. Do one section at a time. First cover the top side on all of the foam pieces, then do one side on all foam pieces, then the next side etc. to ensure the glue is dry and not too sticky by doing one complete on
7. Allow to sit for 24 hours! I suggest doing one section per day so that you don’t kill yourself.
8. Once everything is dry, cut away all of the stray hairs as best you can and lightly spray with Got2B Glued Hairspray
9. Now that your spikes are nice and crisp looking, take them to a well ventilated area and with your Krylon Hunter Green spray paint, you will LIGHTLY spray paint each piece until everything is well blended! There will be parts of the spikes where you can see the foam through the hair, in which case, you can also see the dried glue a bit which has a whitish colour to it. Spray painting the foam pieces lightly will make all of these visible white spots green to blend in with the rest of the hair. DO NOT OVER SPRAY! We are NOT changing the colour of the wig and lightly spraying it has VERY LITTLE EFFECT to the wig fiber colour!
10. Now it’s time to sew it into the wig! With your Lulu base pinned to a wig head, figure out where you want to sew your bottom layer into. This is purely your preference and for me, I put Envy’s headband on my wig head to figure out where the bottom layer needed to go.
11. Once that’s figured out, start from the middle of the back – pin one of the Bottom Layer strips to the back, and sew it in with a curved needle while it’s on the wig head.
12. Repeat step 10 until all of the foam pieces from the Bottom and Middle layers are sewed in.
13. Now for the top layer! At the widest part of your foam pieces, you will fold a little bit of the top (about an inch) until the wrong sides are touching. Sew them together with thread to match/blend into your wig colour. The wefts might peel off a little from the awkward bending, but to fix that, lightly spray it with Tacky Spray and set it aside for a few minutes until it’s dry and then sew it together.
14. Once the crimps are sewed together, it is time to sew the top layer into the wig! The top layer is a bit tricky since Lulu has a skin top, but fear not! Pin the pieces to the wig head so you know exactly where they will be going then remove all of the pieces except for the front bang piece. Keep the bang piece pinned to the wig head and gently peel the wig off the wighead (with the pins still in) and with a thick sewing needle (for chairs and carpets) sew it into the wig and repeat this for the remaining 10 pieces.
15. After everything is sewed in, with your remaining hairspray (if you have no more left, purchase 3 oz. [85 g] Krylon Hunter Green spray paint as you will not need much), LIGHTLY spray paint the wig until any re-glued area’s are blended with the rest of the wig colour.
Wig Cost
Foam: $7.5 (got mine on sale with a 40% off coupon) vs. $25 (not on sale and no coupon)
Spray Paint: $24 (for all 4 cans)
Base Wig and Wefts: $50.50
Glue: $14 (for all 2 cans)
Total cost: $96
Wig Time
Cutting Foam: 3 hours
Spraying Foam: 2 days (3 hours, not including drying)
Gluing Wefts: 5.5 hours (not including drying time)
Sewing Spikes to wig: 8 hours
Total time: Give or take, about 20 hours total
Vintage Wallpaper by ~LaTaupinette
Envy Wig Tutorial Part II and Helpful Information


Image size
900x1224px 730.72 KB
© 2012 - 2024 Xelhestiel
Comments33
Join the community to add your comment. Already a deviant? Log In
How many wafts are in one pack? Can I glue felt onto the foam instead of them?